Advent Craft Instructions with Laura
Hey guys! I’m Laura, and I’m so excited to be guest-blogging for See Hear Love today! One of my passions is making crafts, especially with my kids, and today I’m sharing a craft with you that really focuses on the season of Advent. Instead of those typical advent calendars filled with chocolate, we’re going to make an Advent display that will add a bit more meaning to your Christmas decorations this year. It’s both a craftand an activity that you can do with your family.
First, let me explain the activity! We’re suggesting that you sit down with your family and think about each week of Advent. Click here to download your Advent Cards. Print them, cut them out, then individually answer the following questions about Advent.

Advent Questions:
HOPE: What is something that you’re hoping for this Christmas season?
PEACE: How will you be creating peace in your home this Christmas season? How are contributing towards peace in your community?
JOY: How can you find joy in the midst of the busy holiday season, even when you’re struggling to find it?
LOVE: How are you showing love to your family and community this Christmas?


Read them on each Sunday of Advent (for example, the first week is HOPE ~ read these on Sunday December 3 or the week of ) and share what you’ve written with your family! Hopefully sharing these thoughts and ideas with your family each Sunday will focus on what this season of Advent means to you!
Now I’d love to explain how these cards become a beautiful Advent display ~ let’s get crafting!

SUPPLIES
– Advent cards (print them here)
– Advent tags (print them here)
– Paper bags
– Scissors
– Glue stick
– Twinkly lights
– Basket, OR vases and jars with greenery

- First, download your ADVENT TAGS here. Cut them out, and paste each of them on one of the paper bags. You’ll have 4 in total. These bags hold your ADVENT CARDS that you have filled out with your family.

- If you’d like, decorate your paper bag with stickers! Kids will LOVE this! I used pretty gem stickers.
- Once you’ve placed your completed Advent Cards in each paper bag, seal the bag with some tape!
Now I’m showing you three ways you can display these paper bags!
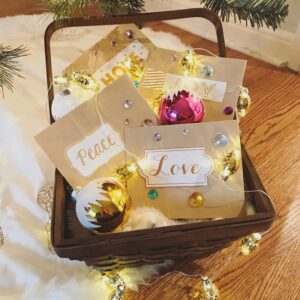
- BASKET DISPLAY
Super easy, just use a basket that you already own, put your bedazzled paper bags inside along with some ornaments and twinkly lights, and voila! You have your display. This would look awesome anywhere in your home where you won’t forget to open your cards each Sunday.

2. JAR DISPLAY
If you love using natural and rustic elements to decorate with at Christmas, then this is the look for you! Place your paper bags in various jars. Add some twinkly lights, pine and birch ranches, and place pinecones around your jars. I love this look on a fireplace mantle!

3. ADVANCED DISPLAY ~ WRAPPED BOXES
Don’t let that title fool you! 😉 But if you’d like to get even more crafty, here are the instructions for these wrapped boxes.
SUPPLIES
– Advent cards
– Advent tags
– scissors
– glue stick
– pretty wrapping paper
– ribbons
– kraft boxes
- First, wrap 4 boxes. Make sure to wrap the lid separate from the box itself.

Decorate the lids of each box with some pretty ribbons. I layered mine for a special look.

3. Download your ADVENT TAGS here. Cut them out, and use the glue stick to glue them to the lids of your boxes. You’ll have 4 in total. Each box will hold your ADVENT CARDS that you filled out with your family.
- Decorate the lids of each box with some pretty ribbons. I layered mine for a special look.
- Once you’ve placed your completed Advent Cards in each box, put these beautiful boxes on display! I put mine on a shelf. They would also look so pretty underneath your tree.

I hope you’ve enjoyed crafting with me today! Share your Advent display on social media using the hashtag #SHLcraft. We’d love to see what you’ve made, and to also hear about how your family is celebrating this season of Advent.